Saturday, January 24, 2015

Block of the Month 2014


I hope you have been enjoying seeing all the quilts inspired by Cindy at Quilt Doodle. I'm going to tell you a little bit about my quilt today.

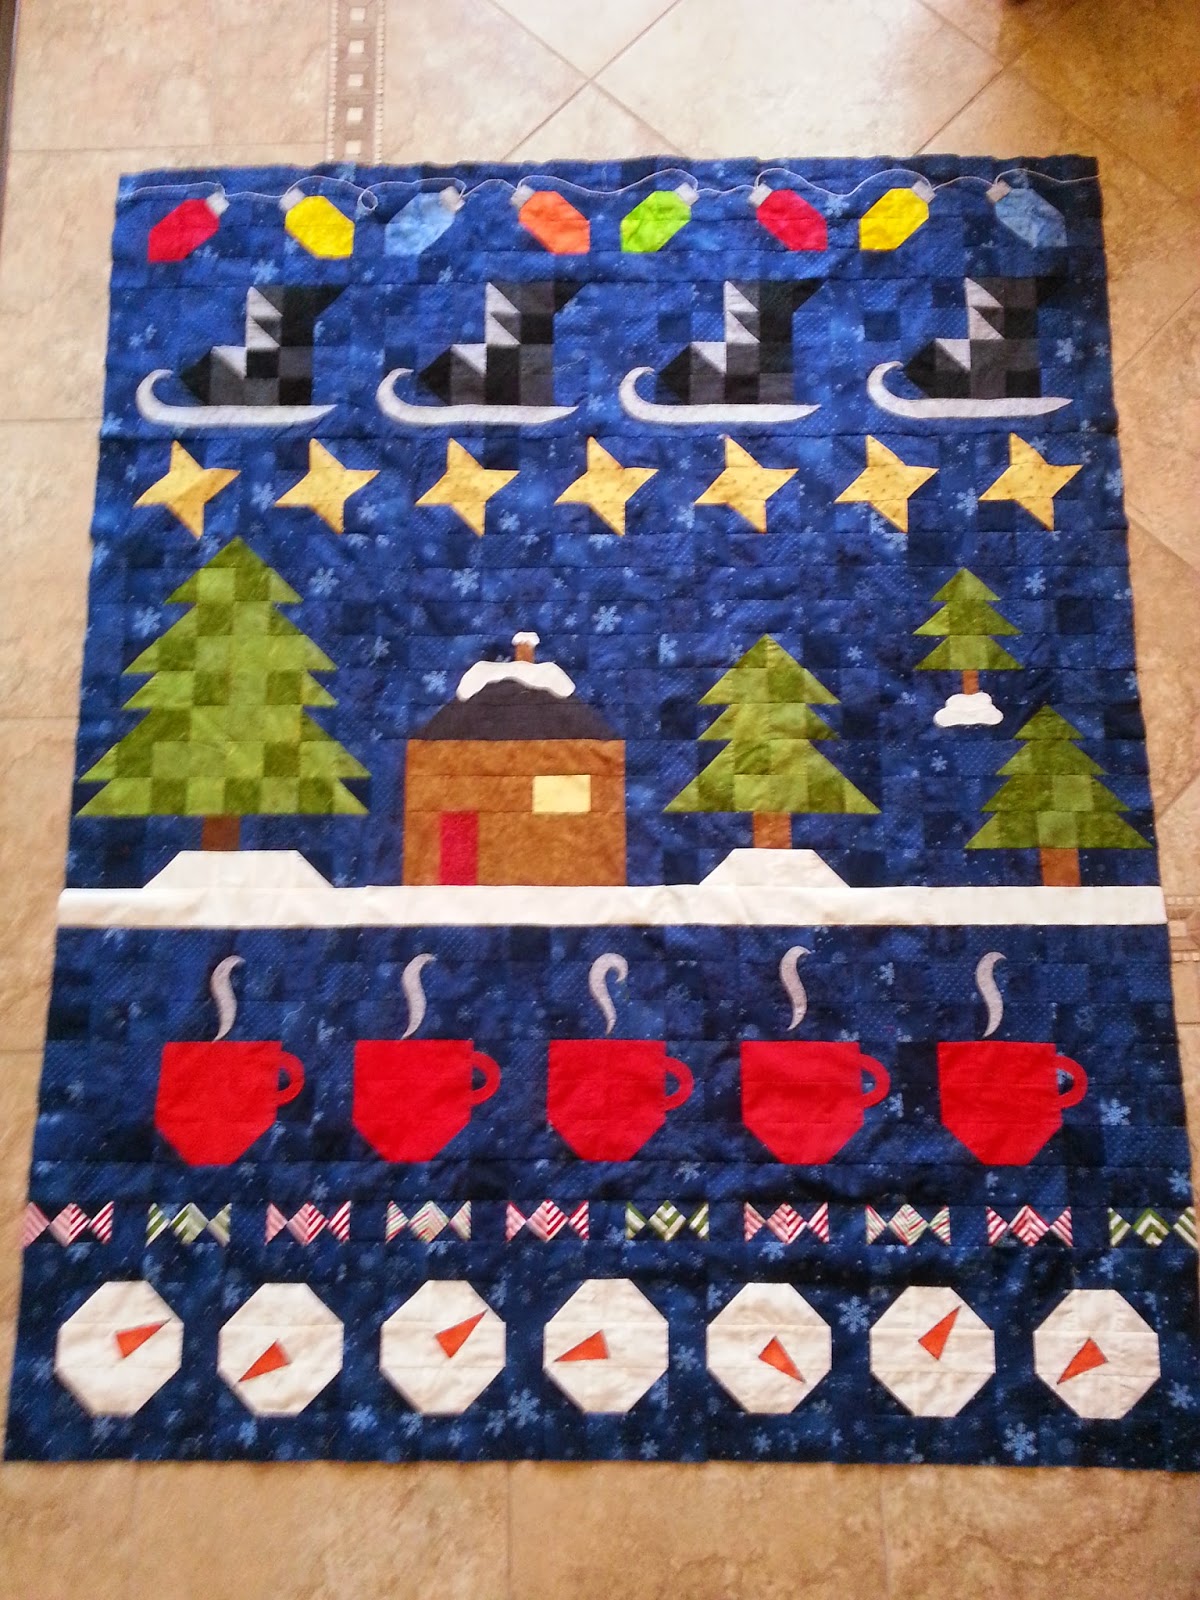
This is the second block of the month that I have done with Cindy and I have enjoyed both of them. At the beginning she told us that this would be a theme quilt and after the first block, or should I say row, it was obvious that the theme was to be winter. I live in the south so I wasn't so sure about a winter themed quilt because we don't have a lot of winter most years! I had another reservation because it became obvious that the quilt would be built with 2.5 inch squares and I struggle with making so many seams meet. I decided to go ahead with the quilt and use it as a opportunity to get better at making my seams meet. Most of the blocks were actually rows which was different from any other BOM that I had made but I loved the way they went together. The only row made of blocks is the row with the trees and houses - it has 4 blocks. I used a cording foot for the first time and it was really easy once I tried to stop guiding the cording and just sewed where it was supposed to go. I found out that applique is a skill I'm still perfecting!

As I laid the quilt out to decide what order to put them in (I found Cindy's layout was the best for me), I found a little (big?) mistake. My row of mugs was 5 squares too wide - I had added an additional column of squares to each cup as I made it. So I took out my trusty seam ripper and began to find the easiest way to remove a strip from between each cup. 

Success! Here are my sections before they are sewn together. 


I changed the tree on the right to 2 trees that were different sizes because I wanted something different.


Here is the quilt top all put together. I have chosen not to add a border and I did a little embellishing after the top was put together (not shown here). I just added a reindeer in the trees and a wreath above the door.


I chose this lovely print from the Snow Happens line for the backing of the quilt and began to quilt. I chose snowflake pattern that I saw on theinboxjaunt.com. It's linear and I made one line of quilting in each row of blocks. I like how it looks so far.


Of course my quilting has not been without mishaps. Below is an example of what happens when you don't listen to your machine. My machine had been jumping a bit on this row but I ignored it until it decided to stop. When I looked on the back, this is what I found. Yuck!

As I ripped out this entire row of quilting, I found a seam that had come apart in the middle. Wierd, huh? So before I moved on, I got out my needle and thread and sewed the entire seam together. 


I didn't get completely finished with my quilting - I've gotten about a third of it quilted but should be finished in a couple of days. After I finish the quilting I will add the eyes to the snowmen. I took a few pictures so that you could see it so far. 


This is what I have quilted so far.
      

  I started my quilting in the center row and did 2 rows above that one then 2 rows below it, alternating the side that I started on. I'm continuing this method the full length - I'm hoping to keep the quilt more square by doing it this way. I had my snowflakes too close together at first (you can see this at the top of the house and in the tree) so I marked a pattern on a few rows to get more of a pattern started. You can see that I alternated the spacing of the flakes on each row, and put in a "snowball" every now and then.


I'm trying to think of what I can quilt on the mugs so that it will be a little different and stand out a bit - I don't want to do any more applique. I'm sure inspiration will hit when I get there!

 Be sure to check out the other quilts on the hop.


January 24th 
January 25th 

Thanks for stopping by to see my quilt!
Have a great day!
Dee


Wednesday, January 21, 2015

Final Catch-up Day


I think I'm finally at the last post to show you what I worked on while I took my vacation from blogging.

Did you know about the NASA Astronomical Quilts! Block Challenge issued by Astronaut Karen Nyberg? She created a star quilt block while in space and she issued a challenge to quilters to create and submit star blocks. These blocks were combined into quilts that were displayed at International Quilt Festival in Houston.

I created 2 blocks - one was in response to a challenge by Pat Sloan and the other was a block that I had been thinking about making and sending in for the challenge.


When I got both blocks finished, I decided to send in the green one (I love green!) because I thought it would be different from most other blocks. I'm saving the red, white, and blue one for some other quilt some day.


I made another baby quilt! It seems that all my friends' kids are beginning to have kids of their own and that's why I've been making so many baby quilts.

This quilt was made for a sweet young lady that I have known for all but the first 2 years of her life. She and her husband had their first child, a little girl in October. I love to make quilts that have the same color scheme as the nursery so I went on a search for pink (bubble gum pink and hot pink), gray, navy, gold, and elephants. The elephants were easy - I had some of that cute Ed Emberley designed elephant fabric left from a quilt earlier in the year. The pinks weren't too hard to find, I left out the gold (way too hard to find the right shade), but the navy was a little trickier. When I found all my fabric I began to talk to a friend about the pattern that I planned to use. She also knows this young lady so I thought she would be helpful. Boy was I wrong! Since she "just loved" a quilt I made another friend's grandchild I began a search to find a similar pattern. (I don't really want to repeat patterns just yet). To make a long story shorter, the pattern we settled on didn't work with the fabrics that I had but I couldn't really tell until I got all the pieces cut. 

I began experimenting with what I had, which was mostly 2 ½ inch squares. 
 
   Here's what I came up with .


I decided to use a variegated thread for the quilting - this way the quilting didn't jump out at you at any particular place on the front. I just did some leaves and flowers - I divided the quilt into quarters, drew a basic path to follow and then concentrated on just one section at a time. This really helped me not to get stuck or lost and miss a spot. In the center I did a stitch in the ditch diamond and a large elephant inside the diamond.
 One more quick thing - I did finally finish the weighted blanket that I was making for my great nephew. I got to him just before school started and it really helps him. This is a close-up so you can see the pockets - they are filled with poly pellets and the whole thing weighs about 8 pounds.


This is the last of what I did the last half of 2014. 

So what's up for 2015?
I'm working on another block of the month - it's one designed by Pat Sloan and it's called Vacation Time. I plan to give it to my father in law for his twin bed but I'll have to lengthen it a row to make it long enough. I also have a few UFOs that I'd like to finish, I've already got the pattern for a quilt for a friend who is hoping to have a baby this year, I need to make my son a quilt (fabric and pattern already picked out for that one) . . .  you know the story.

Cindy at Quilt Doodle Designs has sent out the schedule for viewing 2014 Block of the Month quilts.  I hope you'll take a little tour of all the quilts.

January 24th 
January 25th 
January 26th

I hope you have a good week! Come back on Jan 25 to see my finished block of the month from 2014.
Dee

Saturday, January 17, 2015

Catching Up

Today I'm going to show you the other things that I worked on while I was "on vacation" from blogland.

 HOLIDAY THINGS
One of the things I made was a cute little potholder for a hostess gift for a friend. We celebrated Thanksgiving with them and I wanted to take something as a thank you. I had been wanting to make a pot holder and then I saw this cute little turkey on Jennifer Jangles blog (http://www.jenniferjangles.blogspot.com/). I decided that would be my gift. 


Another thing that I made, was also made for a gift (or gifts). These cute little ornaments are made with an ornament pack from Hummingbird Highway.


I stopped at her booth when I was a Quilt Festival to see all the neat stuff that she had and found this pack that had a printed piece of fusible interfacing and 9 pieces of fusible foam- it was called Taste of Nectar Ornament Pattern. The pieces in the center were cut at 1 inch, all nine were fused onto the interfacing, and then sewn on the lines both directions. After cutting them apart, they were given borders, layered with the foam and the backing, pressed, and quilted. The biggest challenge was making the HST that finished at 1 inch. Because I wanted 10 ornaments to give to the group that I play hand bells, I made one by piecing it and using some fleece. I was pleased with the way they turned out and they were all made from scraps from a table runner I made at Quilt Festival.

Have you ever made a bargello quilt? I had seen them and thought they look really neat but the idea of of making a  quilt was a little daunting. There was a bargello table runner class at my LQS and I decided that was a good place to start with bargello - I could give bargello a try without the commitment of a full quilt. When I went to pick fabric, I found this really pretty piece of fabric.
I knew I couldn't use it for the front so I chose fabrics to go with it and used it for the back. My fabrics are shown here; the top fabric is for the binding.
After cutting strips and sewing them together, I cut  varying widths from the unit.  
It's a very interesting process to build a bargello: sew the strips together, make a tube, cut widths across the tube, and then unsew the tube at different spots. I quilted the runner with a metallic thread - the first time I've ever used one. After some thread breakage, I changed to a needle meant for metallic thread and had success with my quilting. Here's the finished product. It looks very fall and was a great addition to my table in Oct and Nov.
Close up of quilting - can you see the metallic thread?

 It looks like I will need one more post to finish up with all that I have worked on the last half of 2014. I can't believe that I still have a few things to show you!

I'll be back in a few days to finish up and then again on January 25 to show my Block of the Month from last year. 

See you soon.
Dee


Friday, January 9, 2015

Hello Again


I have just taken a little (long?) vacation from blogging. I'm not exactly sure what happened because I really didn't plan on doing it. Anyway, I'm back and plan to try not to take such a long break next time. 

I was still sewing and quilting on my break so I have several things to share. I may make 2 posts in the next few days and then another on Jan 25, when I will share my block of the month for 2014.


BLOCK OF THE MONTH
I think I'll start with my block of the month blocks since my last post. I finished all of the blocks in October (many of them were rows); the blocks were all made with 2 inch finished squares and the theme was winter. It's going to make a nice quilt. 


These are the blocks for the rest of the year - June through October.

When I began to lay out the blocks and rows to assemble the quilt top, I found a mistake - somehow I had made one row too long. After some searching, I realized that I had added an extra column between each cup. After some unsewing, I was able to make the row the same size as the others.
Whoops, I made a mistake!
On January 24, 25, and 26,  Quilt Doodles Design is having a blog hop of those who want to show their quilts. Check her website at http://quiltdoodledesigns.blogspot.com/
on the 24th and you should see the list of those participating. My day is Jan 25th so check back that day to see my quilt put together and hopefully quilted.

Graduation Quilt
One of my nieces graduated from high school last May and a few months before graduation, her mother called me. She wanted to know if I knew anything about making t-shirt quilts because she was thinking about making one for her daughter. The short story is that I found out my LQS was having a class in Aug and I decided that a t-shirt quilt would be the perfect graduation gift. I was given approval to make a quilt, she gave me the t-shirts, and we collaborated over fabric (thank goodness for smartphones!). I finished it and took it to her in the middle of September. Here are some pictures.


Planning the layout


Quilting it on my domestic machine - it was really heavy.


My plan for the border design on the left and the actual border quilting on the right. It's adapted from a design I found at theinboxjaunt.com. I adapted it because I needed to travel down the border with it and because I couldn't do the design as intricately as she did. I was really happy with the result.


On the left is the label (so you can see the southwest fabric we chose for the back) and on the right she is posing with the quilt.


I found this t-shirt that I just loved and made it into a pillow for her. If you look close, you can see words that are associated with Texas A&M University (Gig 'em Aggies!) - they are very visible in the picture but when I first saw the shirt I only saw the words and not the fact that there was a block ATM.